It's rare that you see content on the Web that has not gone through some sort of review and refinements cycle -- what most of us in the industry would call a workflow process. This article is part two in a series on SharePoint (MOSS) 2007 Web Content Management. The first article provided a general overview of web content management in MOSS. In this installment we focus on one of the many flexible parts of SharePoint's core: the workflow engine.
A SharePoint Workflow Primer
Before we get into the how of implementing workflow in SharePoint, let's review some of the basics. It's a Business Process A workflow is a set of co-ordinated event-driven activities. Assigning workflow to a document, or a piece of content is the act of binding a business process to this entity. For example, you create a press release announcing your latest product release. Before that release can go out, it needs to be reviewed by marketing, by the manager of public relations and it needs to be translated into French and Spanish. According to what your content team has decided, all press releases must go through this business process to ensure the information is accurate and available to all interested parties. For all content on your site -- whether it's a document, text-based, or some other type of media -- one must (should!) carefully consider what needs to be done to it before it can go live. These activities combine to create workflows.
Types of Workflow
SharePoint workflows are based on Windows Workflow Foundation (WF) which is a base set of technologies that programmers can access using Visual Studio or SharePoint Designer. There are two types of workflow supported:
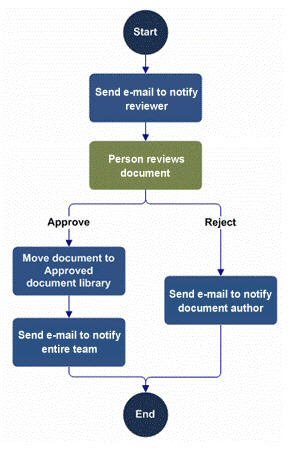
Sequential - this is similar to a flow chart style where there are decision points along the way that indicate what the next step is in the workflow based on some condition being met (or not met). These steps generally execute in a specific order - although there are exceptions.
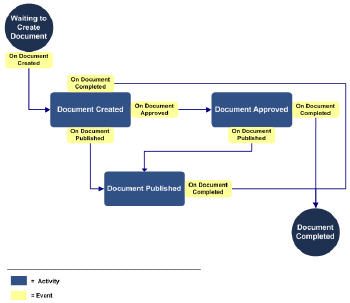
State Machine - this style workflow is more complex and consists of a number of states, transitions between states and actions.
Workflow Architecture
The basic components of a workflow include: * an XML-based markup file that contain the basic information about the workflow and the activities contained within it * an XML-based rules file that contains the business logic of the workflow in declarative rules form * one or more aspx or Info Path forms Unless you are using SharePoint Designer, workflows are compiled into assemblies and installed as features at the site collection level. Workflow associations are stored in the database for sharepoint. For each type of content (document, list, or a content type), an association is made is made in the table. You can have more than one workflow associated with a content type, but they can't be the same type of workflow (i.e you can have an approval and a translation workflow, but not two approval workflows). In addition, workflows can be manually initiated or system initiated based on an event (i.e changing the content).
SharePoint Administration: Workflow Settings
There is an administration option for workflows that allows you to set some global settings at the Web Application level. These setting include whether user-defined workflows are enabled and how users who don't have site access are notified of their participation requirements in a workfkow (i.e they are assigned a task).
Workflow out the box
SharePoint provides a base set of workflows out of the box including: * Approval workflow * Collect Feedback * Collect Signatures * Disposition Approval * Three-state * Translation Management Not all of these workflows are turned on by default. To see what's activated, view the Features at the Site Collection level. By default, when you create a publishing site with workflows, an approval workflow is automatically attached to each content type created for the site. You can add new workflows through Site Actions...Site Settings...Modify Pages Library Settings. Admin Page for adding new workflows to a page
Starting a Workflow
To start a workflow manually, you need to go to the workflow navigation on the page you have added or edited and select Start Workflow (your page must be checked in before workflow can be initiated). In the example below, an initiation page is displayed that enables the author to select the approver group, set a target approval date and enter any comments necessary. You can also enter the ids of any people you want notified of the change but that don't have to do any specific tasks. You can view the status of a workflow at any time. This screen shows who initiated the workflow and when and what the current status is. It also shows the tasks related to the workflow and the status of each task. At the bottom of the screen a workflow history is displayed. If necessary, the workflow can be canceled or terminated. Canceling a workflow simply stops the workflow and marks all tasks as completed and the workflow as canceled. Terminating the workflow cancels it, but also permanently deletes all tasks related to the workflow. You would use terminate if the workflow has hung for some reason and you need to end any tasks that may be in limbo.
Approving or Rejecting Tasks
Approvers see a task on their task list to approve content. They click the task and are taken to an Approval Screen. At this point, they can approve or reject the changes and enter comments. Alternately they can select to reassign the task or request a change. Reassigning the task gives it to another person (as shown in the figure below). Requesting a change means you want someone to make a change to the content before you will approve it. You can enter the person's id, the changes required and the date the changes are required by. These types of workflow forms are modification forms that enable a user to interact with the workflow to initiate required changes (i.e. reassigning tasks). There is one other type of workflow form, the task form. These forms used for viewing the tasks and acting upon them (i.e. approving or rejecting).
Creating Workflows in SharePoint Designer 2007
You can use SharePoint Designer 2007 to create custom workflows for your site. The designer enables you to create workflows using a wizard type approach. This does have limitations. The wizard is declarative rules-based and code-free. You can’t create activities using this wizard, you can only select from a pre-defined list. The other draw back is that you create the workflow for a particular site and for a particular list or document within that site. You also cannot create a workflow for a content type using the designer. To create a workflow, open the site you want to add it to and select the list type to attach the workflow to (see figure below). You can create one or more steps for your workflow. For each step you assign conditions and actions when the condition is met. If you have multiple actions to take you can apply them in one of two ways: # Serial: the actions happen in a specific order (denoted by “then”) # Parallel: actions can occur at the same time (denoted by “and”) You can also create forms to make the workflow more dynamic and flexible. In SharePoint Designer you can include 2 types of forms in your workflow: # initiation forms – these are the forms that gather information when the workflow is first activated (such as date approval required) # custom task forms – these allow users to interact with the tasks in the Task List The designer generates the forms as aspx pages and stores them with the source files for the workflow. You can open these aspx files in Designer or another editor and modify them. When you have completed creating your workflow, two source files are generated and stored in a document library within the site. The workflow is not compiled into an assembly, rather when the workflow is initiated; the source files are compiled and stored in memory. There are two XML-based source files: * Markup File: outlines the activities included and the basic workflow information * Rules File: contains the business logic of the workflow in declarative rules form
Creating Workflows in Visual Studio 2005
Creating workflows in Visual Studio 2005 is much more involved than using SharePoint Designer, but it’s also much more robust. Workflows created using Visual Studio are compiled assemblies with each activity in the workflow represented by a .net class. Visual Studio has a workflow designer that you use to create your workflows. There is a graphical representation of your workflow that you create by clicking and dragging components in the interface. Sample of sequential workflow in Visual Studio 2005 Only a subset of the WF activities are available when designing a workflow for a SharePoint site. However, in addition to these activities, SharePoint itself provides a number of activities via it's own workflow namespace (API). Sample of state machine workflow in Visual Studio
Final Thoughts on Workfow in SharePoint
Workflows are critical to most publishing operations. How you implement them is also important. One needs to clearly document the business process required with each type of content on your site. Outline the steps that need to be completed and any conditions and actions associated with the step. Also, it's important to consider how the workflow will actually transpire in the real world. Will it be sequential, or will there be a lot of going back and forth that would require a more complex process to be designed? Finally, decide if the out of the box workflows are sufficient, or if new ones need to be designed and implemented. Whether you create new ones in SharePoint Designer or Visual Studio depends on how many different types of content you have and how different the workflows are for each type. As with all things SharePoint, success with workflows depends on high quality planning before you build. The devil's in the details and it's best to look 'em in the eye sooner than later.
Stay Tuned -- Part Three: SharePoint Web Content Management Deployment
Our first article in the series brought you a high level overview of Web Content Management in SharePoint 2007. In this one we set the stage for a solid understanding of SharePoint Workflow, and in the next article we’ll be covering content and configuration deployment scenarios. Stay tuned here, and by all means, if you have questions or suggestions, jump into the conversation.
About the Author
Barb worked for CMSWire from November 2007 through October 2013. She has over 10 years’ experience as an IT solutions architect focusing on content management and enterprise collaboration.