Gone are the days when you needed to create paper prototypes of a page and test them in front of focus groups or run them through usability testing. Technology has evolved this process. The Google Website Optimizer now helps one test and optimize a website all in the comfort of a real live visitor base. The Optimizer has been around in beta status for awhile now. We first heard about it back when Clickability put out a PR announcing their addition to the Website Optimizer Technology Partner (WOTEP) program. This WOTEP program has content management providers as partners with Google to help integrate the Website Optimizer with their solutions. But you can use the Website Optimizer on your own. And here we show you the basics of what the tool does and how it works. To use the Website Optimizer you need to have a Google AdWords account -- so set this up before you get started. [Editor's Note: As of April the Optimizer no longer requires an AdWords account, just a Google Account. The two products are however complementary.] There are two types of tests you can conduct with the Website Optimizer: A/B Split Testing and Multivariate Testing.
A/B Split Testing
This is the process of testing completely different versions of a particular web page. Google recommends this test if you have less than 1,000 page views a week and/or want to test a different look and feel for your page.
Multivariate Testing
This is the Process of testing different combinations of content in multiple locations of a particular page. Google recommends this test if you have more than 1,000 page views per week or if you want to try different content on a page (i.e., different images, headings, etc.). Depending on the test you choose, the setup is a little different.
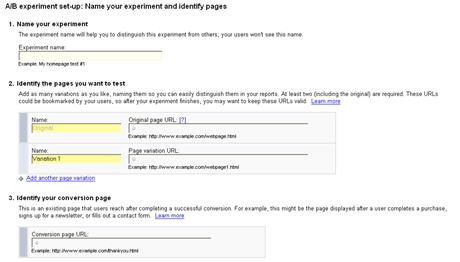
Overview of A/B Split Testing
The setup of this type of test is pretty straightforward. Here are the steps: # Select the page you want to test # Create any number of variations of the original page you want to test - each page must have a unique URL # Add Tags to each of your variations -- or experiment pages # Identify the "goal" page you want to reach - this will inform Google a conversion has taken place # Run your test # View Reports # End your test
Tagging Your Pages
The tagging of your pages requires some knowledge of HTML. There are two scripts to install for this type of test: * Control Script: To be added directly after the <head> tag on the original page, this script ensures that the experiment pages are switched randomly and are displayed an equal number of times. * Tracking Script: To be added to the original page, all experiment pages and the conversion page just before the closing </body> tag, this script ensures that all pages are tracked for the experiment
Overview of Multivariate Testing
Setting up the tests for multivariate testing is more complicated than performing A/B Testing. This type of test requires that you add tags to your test page and define a number of potential variations for the sections you have chosen to test. Here are the basic steps for the Multivariate test: # Identify experiment pages # Test page section planning # Add tags to experiment pages # Create variations # Review experiment settings and launch # View your reports # Stop the experiment
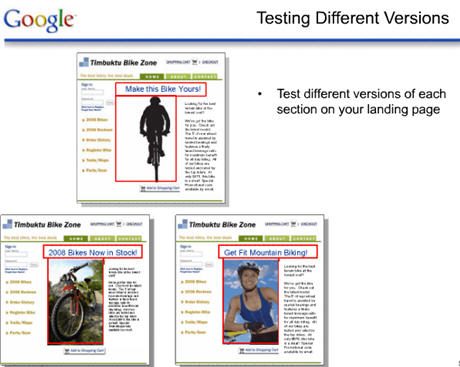
What Should You Be Testing?
Google doesn't provide you with advice on what specific things to test to improve your website. That's something only you and your marketing team can really do. They do suggest areas of a page that you might want to consider testing such as: * Headline * Images * Promotional text * Calls to Action
Tagging Your Pages
There are three scripts required for this type of test. The first two are the same as the A/B Split Testing: * Control Script: To be added directly after the <head> tag on the original page, this script ensures that the experiment pages are switched randomly and are displayed an equal number of times. * Tracking Script: To be added to the test page and the conversion page just before the closing </body> tag, this script ensures that all pages are tracked for the experiment * Page Section Script: This script is used to define the different page sections that will be changed for the test. The script tags the beginning and end of each section and you need to name each section so you can read your reports later on. Here's an example of this type of script: <script> utmx_section("Headline") </script> <noscript>Welcome!</noscript> .
Creating Your Variations
Once you set up your tags on your pages, you will need to create the different variations of content for each page section you have tagged. You do this directly in the Website Optimizer tool -- no coding required. Here you identify the page section you are creating the variation for by entering the name of the page section you created when you set up the tag script for that section. The Website Optimizer provides you with an editable version of the original text. You create a new variation for each section you want to test. It's important to note that Google is testing not just the original variation, but combinations of the variations you have defined. You are provided with a preview button that allows you to see what potential variations your users will see.
Double Check Settings Before You Start
You can't change the experiment once it's been started, so the Website Optimizer provides you an opportunity to review your settings and variations before click go. Also, at this time you have to identify how much of your traffic you want included in the test. Google says the more traffic you include, the faster the test will run.
Viewing the Test Results
It takes about an hour before reports start being generated from your tests. Until then, and throughout the experiment, you can view the progress of the testing including how long the test has been running and the number of impressions and conversions tracked so far. There are two reports available: Combinations Report and the Page Section Report.
Combination Report
The Combination Report show the results of all the page combinations made from the page variations. The Estimated Conversion Rate Range column tell you how well that page variation performed relative to the original page. The Chance to Beat Original column tells you the probability the combination will be more successful than the original.
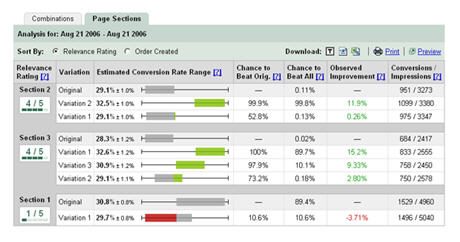
Page Section Report
The Page Section Report focuses on which variations to each page performed best. The Relevance Rating is the only column different from the Combinations Report and it tells you how much relevance a particular page section has on your experiment.
Additional Items to Note When Using the Website Optimizer
You can use the Website Optimizer on more than one website at a time. You are however limited by Google Analytics. For new analytics accounts, you can experiment on 200 pages at a time. If you have an existing analytics account that number may be less. According to Google, using the Website Optimizer will not affect your Google search ranking. This is because the optimizer keeps the original content of your page in the HTML source code of the page making it visible to search engine spiders all the time. To continue your research, dig into the official Website Optimizer overview.
About the Author
Barb worked for CMSWire from November 2007 through October 2013. She has over 10 years’ experience as an IT solutions architect focusing on content management and enterprise collaboration.